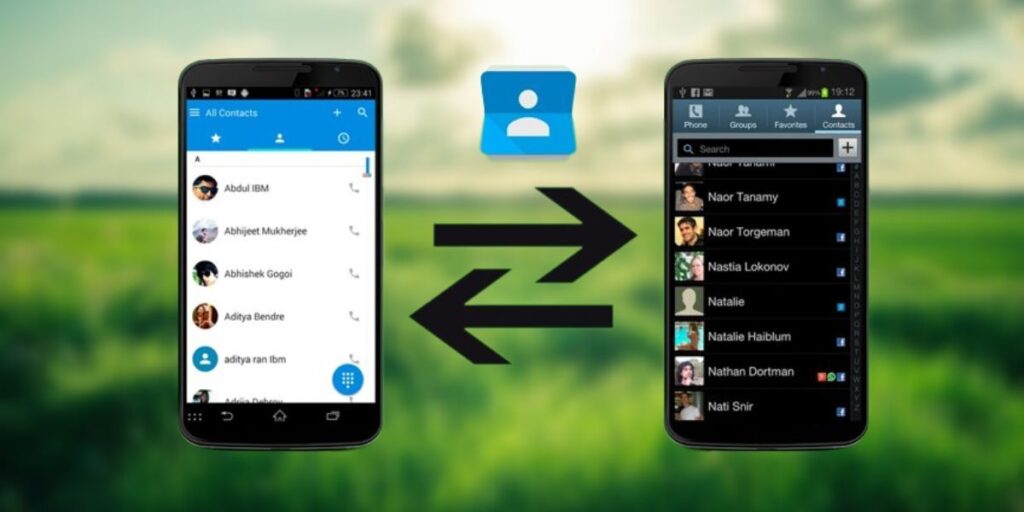
Contacts on mobile devices are important for communication. They allow you to store information about the people you contact, such as their name, phone number, email address, etc. This information can be used for simple things like making a call or sending a text message. Additionally, contacts on mobile phones can be synced to other devices such as computers or tablets. That means you can access your contacts from any device.
When you change your mobile phone or service provider, it is important to transfer your contacts to the new device. This can help you avoid losing information about family, friends or colleagues. It is a very easy and fast thing to do, and for this you can use different data transfer methods. In this tutorial, we’ll show you how to transfer your contacts from one cell phone to another without dying trying.
7 ways to transfer contacts from one mobile phone to another
Updating your Android phone? If so, you may want to transfer your contacts to the new device. However, it can get a bit complicated if you add them one by one. The good news is that there are several methods that you can use. We leave 7 here.
Using a Google account
The easiest and most effective way to share contacts from one Android phone to another is to use a Google account. It is available on all Android devices and is easy to set up. Additionally, it lets you save and share contacts across multiple devices where you’re signed in to your Google account. It also helps you to delete contacts once you log out.
There are two ways to transfer from one mobile phone to another using this method, the first is by syncing contacts and the second is by exporting and importing contacts. To do this, both devices need to set up a Google account and connect to the Internet. Let’s see how to do it in each case:
Synchronizing contacts
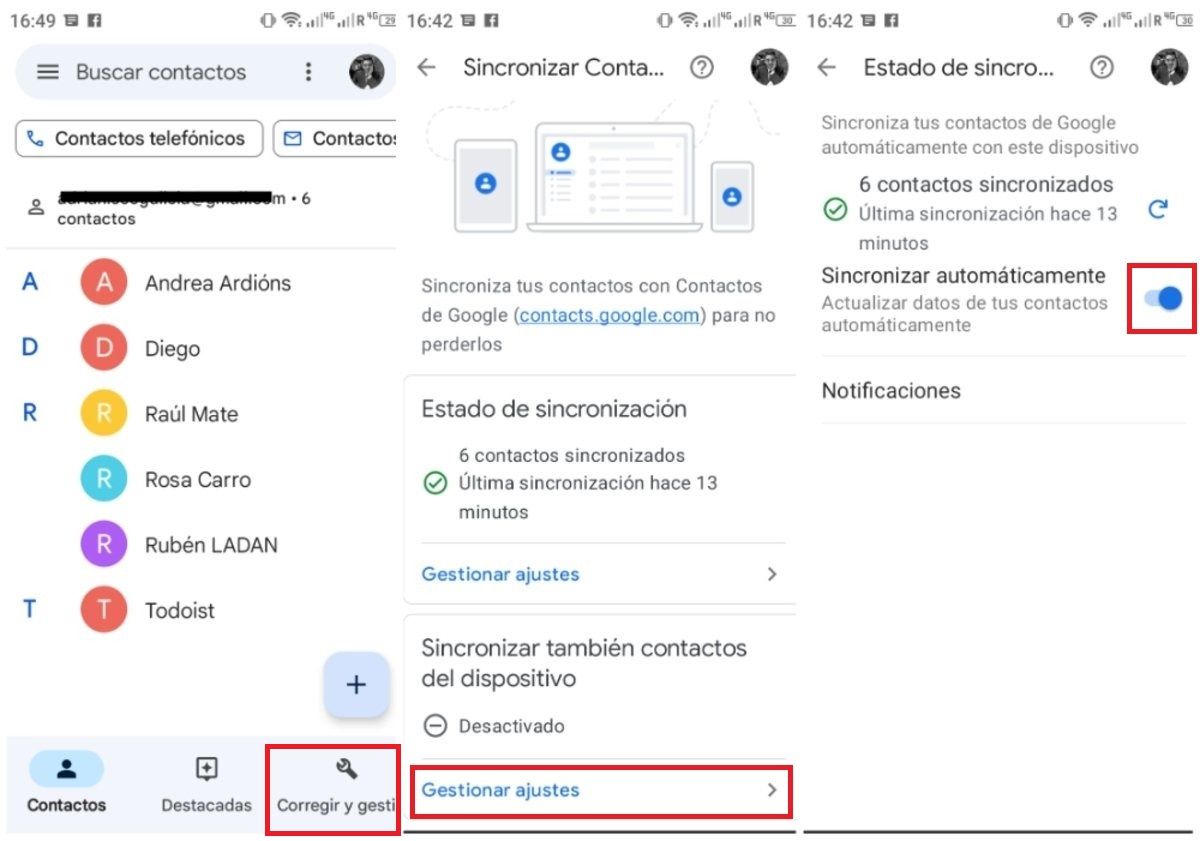
This is the easiest way, just follow these steps:
Open the Contacts app on your source device. At the bottom of the screen, tap Edit & Manage > Settings. Next, enter the Google Contact Sync settings. Select Manage settings. Tap Sync Status. Enable the Sync Contacts option. On the destination device, sign in to the Google account you used on the source device. Open the Contacts app. Contacts from the Google account are automatically synced to the target device.
Export and import contacts
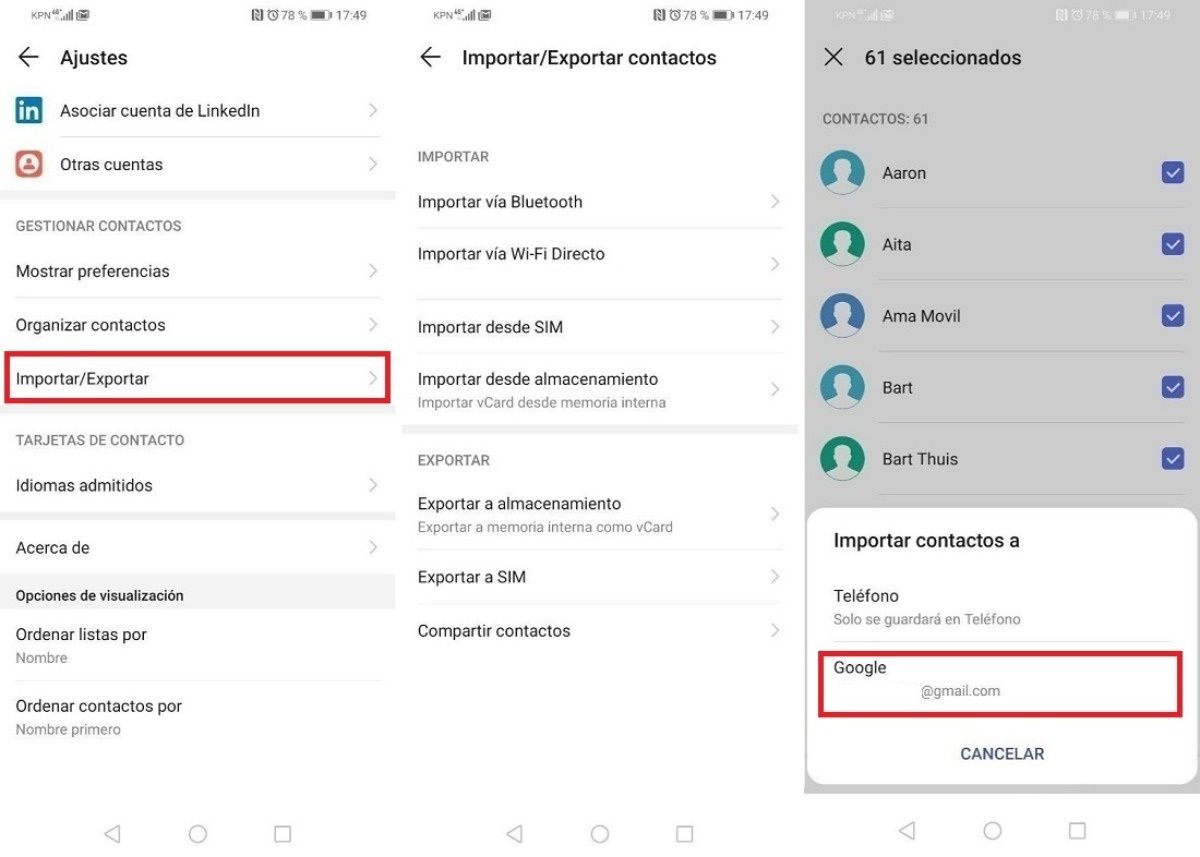
If you don’t want to sync contacts, you can export and import them to the destination device. All you have to do is:
Open the Contacts app on your source device. At the top of the screen, tap More > Import/Export. Select the file format you want to export contacts to. Save the file in a safe place. Open the Contacts app on the target device. At the top of the screen, tap More > Import/Export. Select the contacts file you exported from the source device and import them to your Google account. Finally, the contacts will be transferred to the destination device.
Use of third-party applications
Transferring contacts from one phone to another can be a tedious process, especially if you have a large contact list. But there are several third-party apps that make the process easier. Some of these include: Copy My Data and Move to iOS. Let’s see what each one does.
Copy my data
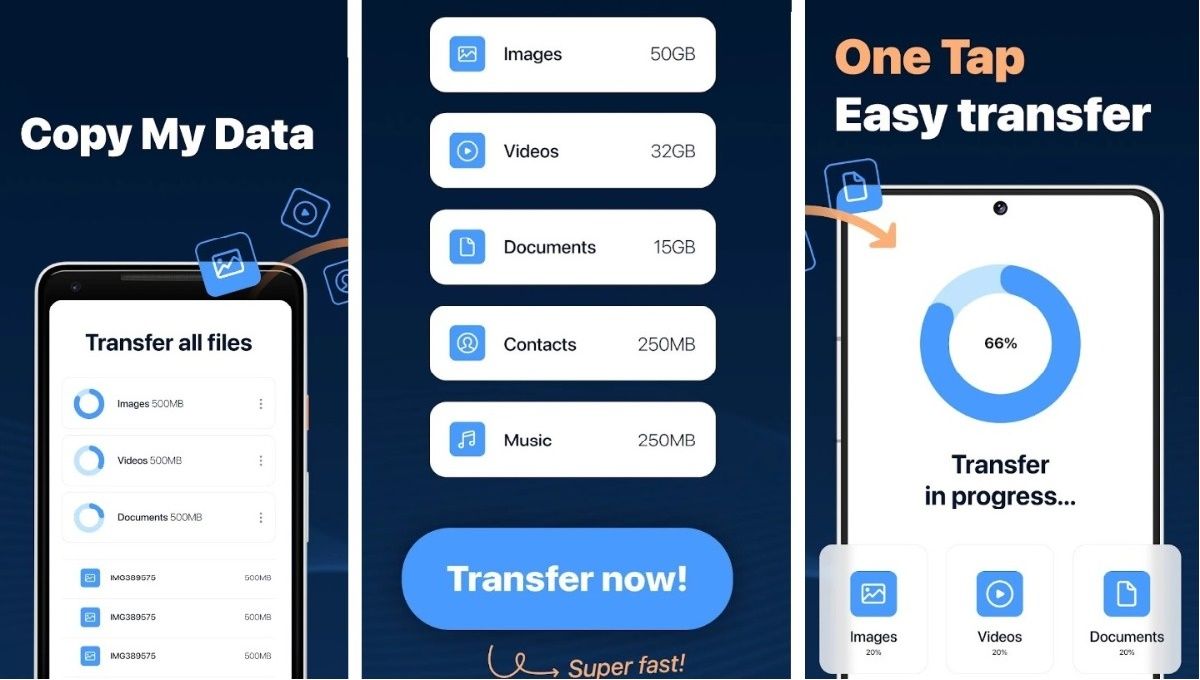
One of the best third-party apps for transferring contacts is Copy My Data. This app is free and compatible with various devices. It allows you to quickly and easily transfer contacts, messages, photos, videos and other information over a Wi-Fi network without the need for a computer. Regardless of your data, Copy My Data works on both Android and iOS.
Follow the steps below to use Copy My Data.
Download and install the app on both devices. Open My Data Backup on both phones. Select the Contacts option. Follow the on-screen instructions to connect both phones. Select the contacts you want to transfer. Click Start.
After the transfer is complete, the selected contacts will be transferred to your new mobile phone. When transferring data from one phone to another, the original file will not be deleted, so don’t worry about losing anything in the process.

Move to iOS

Thinking of switching from Android to iOS? If so, you’re in luck. Apple has made the migration process very easy and secure. With the Move to iOS app, you can transfer all your data automatically and in just a few steps. This app transfers: contacts, message history, camera photos and videos, email accounts, calendars and WhatsApp content.
To use Move to iOS, you must first ensure that both devices, your old Android and your new iPhone or iPad, are nearby and connected to power.
Then follow the following steps.
On your new iPhone or iPad, choose Settings. When you get to the “Apps & Data” screen, select Migrate Data from Android. Open the Move to iOS app on your Android device. Scan the QR code displayed on your Android device on your new iPhone or iPad. Enter the security code on your Android device. Finally, the app will start moving your data. Depending on the amount you have to transfer, the process may take a few minutes.

Using an SD card

Using an SD memory card is a quick and easy way to transfer your contacts, even if you’re not very tech-savvy. To transfer your contacts, you will need the following items: Two mobile phones with SD card slots and a blank SD card with enough space to store all your contacts.
Follow these steps to transfer your contacts from one mobile phone to another via SD card.
Insert the SD card into the mobile phone you want to copy contacts to. Open the Contacts app on your mobile phone. Look for the option to export contacts. On some devices, this option is usually found in the options menu in the upper right corner of the screen. The option to export contacts on other devices is available in the Settings menu of the Contacts app. Select the contacts you want to export. You can select all contacts or just some. Select the SD card as the destination for the exported contacts. Follow the on-screen instructions to complete the export process. After exporting the contacts, remove the SD card from the phone and put it in the new phone. To import contacts to the new mobile, simply follow the previous steps, but this time click on the import option. Select the SD card as the source of imported contacts and follow the on-screen instructions to complete the import process.
through the computer
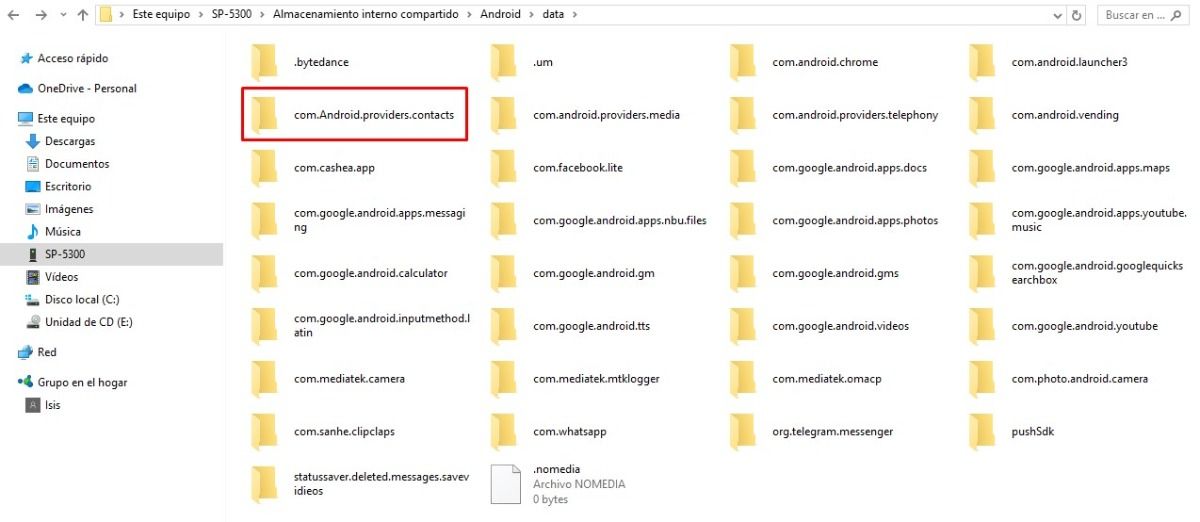
The computer is an effective way to transfer information from one mobile phone to another, especially if one of the phones is very old. To copy data from one mobile phone to another with a computer, do the following
Connect the original mobile phone to the computer with a USB cable. A notification will appear on your mobile phone telling you why the USB connection is being used. Select Transfer files. Once on your computer, go to “File Explorer” and search for the specific name or model of your mobile device. In your phone’s storage, find the folder that contains the contacts you want to copy. Right-click and select Copy. If the contacts are stored in the Android mobile, you can find them specifically in the /data/data/com.Android.providers.contacts/databases directory. However, on some phones this folder may be hidden by default. Once the folder is found, connect the second phone to the computer using a USB cable. A notification will appear on your phone telling you why the USB connection is being used. Select “Transfer files”. Open File Explorer on your computer. Find the model name of the second phone in the list of devices. Double click on it to access its contents. Select an empty folder on the second phone. Right-click and select Paste. If the files are very large, the transfer process may take some time.
Using a SIM card
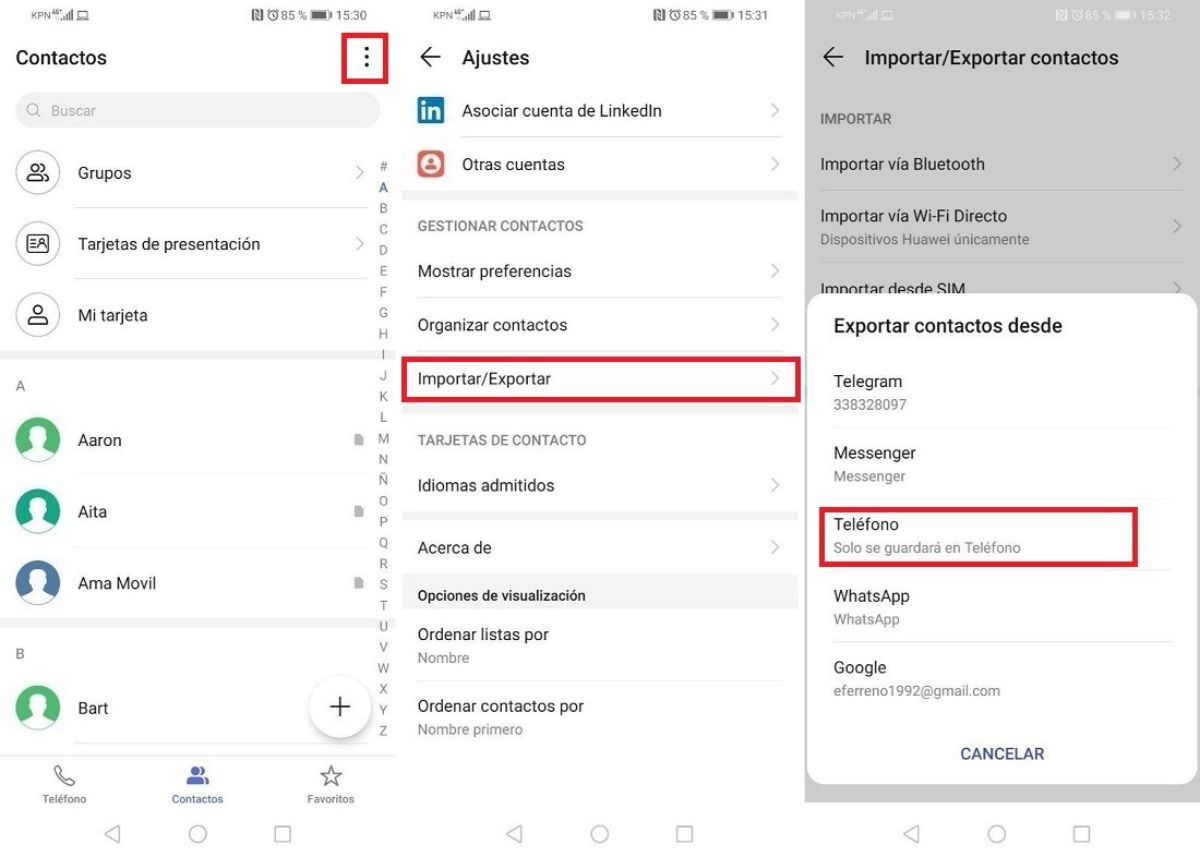
Before explaining other ways to transfer contacts from one mobile phone to another, we should clarify that by default contacts and their details are stored in the device’s memory. So, if you are getting a new phone and plan to transfer your SIM card, your old contacts may not appear on the new device. To overcome this problem, we show you the easiest way to copy your contacts to the SIM card, ensuring that you take them with you no matter what mobile phone you use.
Launch the Contacts app on your mobile device. Click on the three vertical dots icon in the upper right corner. Access the Settings section. Enter the Import/Export section. Select Send to SIM. In the Export contacts section, select Phone to copy the contacts stored on your device. Mark all contacts, tap Select All, and then click OK.
These steps will make it easy for you to copy all your contacts to the SIM card. After copying them from your old phone, simply put your SIM into the slot of your new Android mobile. When you turn on the device, you will see that the copied contacts will automatically appear in the app.
If the contacts do not appear, you must do the same steps that we explained, but in reverse, that is, tap Import from SIM card. In this way, all data will be copied to the internal memory of the terminal.
Transfer your contacts in VCF file
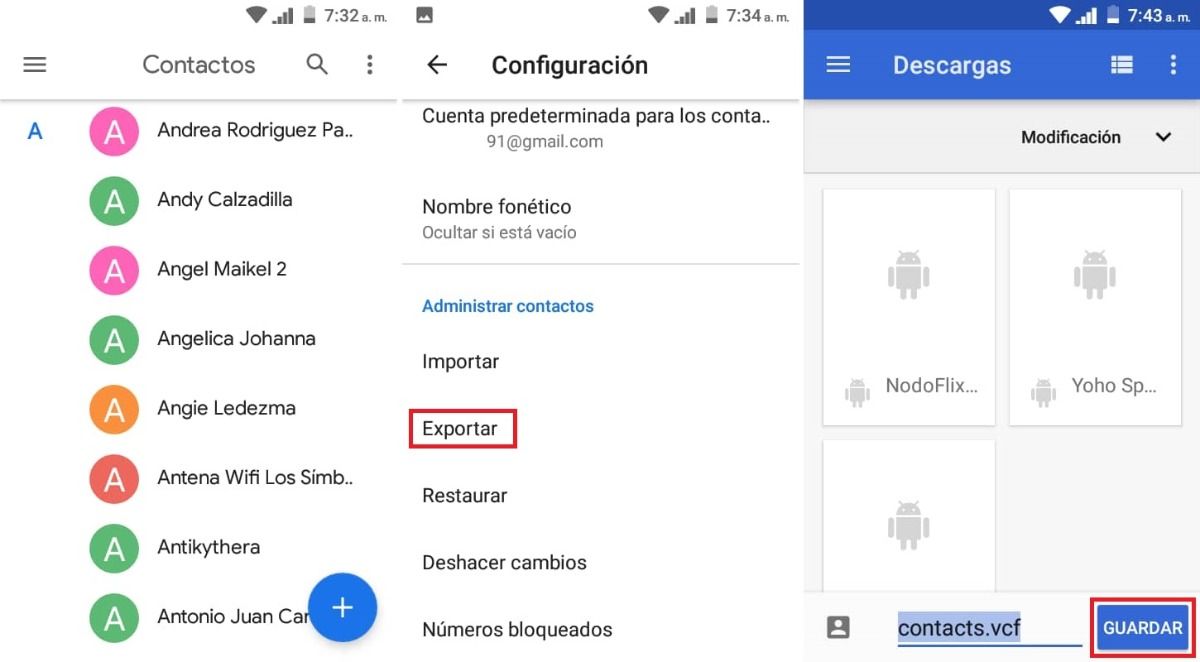
It may also be a good idea to save your entire contact list in one file that you can transfer to your new device. These types of files are generally in .vcf format. Next, we will explain in a simple way how to create and store this file:
Open the Contacts app. Click on the menu above and access the settings. A menu with the option to export will appear. Tap on it. Depending on your terminal model and operating system version, several options will open, but you may have an option similar to Exporting to Storage. Click on this option. At this point, your mobile will give you the option to generate and save a file that ends with the initials “.vcf” and displays the name to save the file. Tap the OK button. It will ask you a box if you want to confirm the export. Tap Accept.
Your phone will now start the process of backing up your contact list. You’ll recognize the start of the process when you see a small drop-down arrow-shaped icon in the notification bar on your screen. At the end of this process, your contacts will be saved on the device.
Send this file to your new mobile phone, you can do it via email, instant messaging, cloud or wireless connections. Once you have the .vcf file on your new phone, follow these steps.
Open the Contacts app. Click on the menu above and access the settings. Tap on the import option. Locate the file and click on it. Then press OK to complete the import process.
Wireless via Bluetooth
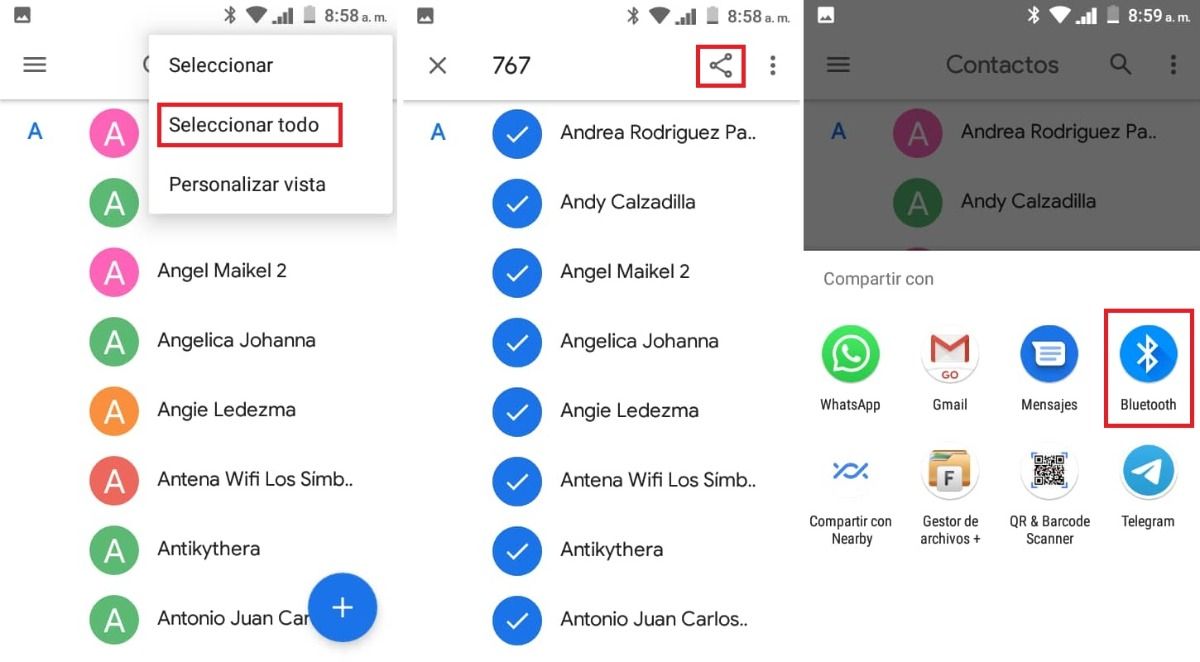
With this method, you can easily transfer your contacts from one mobile phone to another. The known point here is that the mobile sends the contacts to a vCard (.vcf) file before transferring them via Bluetooth. This .vcf file is sent to the recipient’s phone via Bluetooth, thus allowing the contacts to access that device. We provide detailed step-by-step instructions for performing this task:
Enable Bluetooth on both phones and make them discoverable. Go to the Settings of the Contacts app and tap Select All. Click on the Share icon. You can see the contacts start loading. Next, select Share via Bluetooth and select the recipient. Once all the contacts are on the recipient’s mobile phone, you just need to make sure they get into that phonebook.
Each of these methods has its own advantages and disadvantages, so it is important to choose the one that best suits your needs. Whichever method you choose, make sure to back up your contacts before starting. That way, if something goes wrong, you can restore them.
